On a daily basis, my inbox is inundated with various inquiries. From subjects about mommyhood, to food, blogging, relationships, etc. But the most popular subject that I’ve received to date has to be on photography/ photo editing.
Instead of responding to your emails individually, moving forward I’ll consider writing a post on an overwhelmingly popular request/inquiry. For a mom blogger, this will save a lot of precious mommy time.
Ever wondered how to isolate colors as seen in the right picture below?
 Using a picture that I’ve taken, I isolated colors of the main dahlia. This is a cool effect to create if you want to highlight a certain subject.
Below is a photoshop (CS4) tutorial that shows you how I created this effect. I’m sure there are MANY ways to achieve this, however, this step by step process is how I do it. The 6 steps are simple & easy which is what I’m all about!
 Step 1. Create a duplicate layer
Open an image that you want to create the Isolate Color effect on. From the top tab click on Layer -> select Duplicate layer
Step 2. Convert the image into black & white
From the top tab click on Image -> select Adjustment -> select Black & White
 Step 3: Adjust black & white settings (which will automatically pop up after step 2)
I usually just click OK and don’t mess around w/ the settings.
 Step 4. Click on the Eraser Tool on the left vertical menu
The eraser tool will allow you to erase/remove the black & white color mode from any chosen subject(s). Once erased, the colors from the first layer of the original image will be revealed.
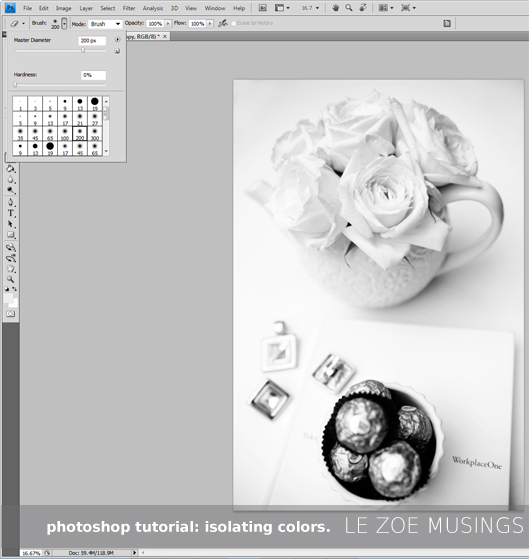
 Step 5. Set Eraser brush diameter, opacity, flow & hardness control
These settings allow you to control how much color intensity/opacity you want to restore. If you want to restore half of the color opacity, set opacity to 50%, etc. Use a large brush diameter for bigger areas and smaller ones for small areas and around the edges of the subject for more precise control.
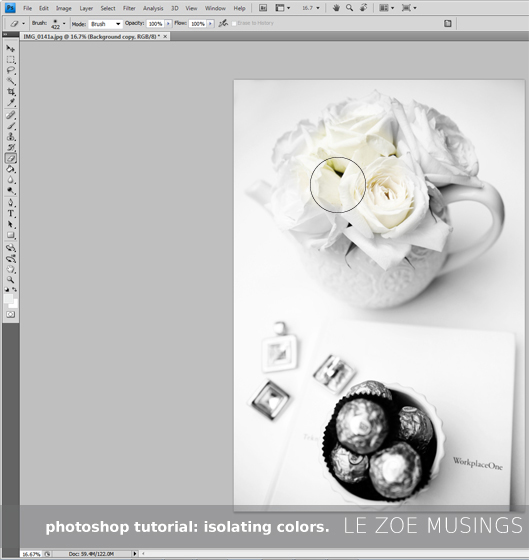
 Step 6. Erase over desired areas/subjects to restore color
With the eraser tool clicked & settings set, start erasing the areas of the image that you want to restore color. Notice my eraser brush stroke diameter (outlined circle over the roses). Once I get to the edges of the roses, I’ll decrease my brush stroke.
A series of photos that I’ve taken w/ the Isolate Color effect below:


 Hope you found this tutorial helpful!
In no way am I claiming to be a pro at photography or photoshop. Most of my knowledge is from trial & error and self researching/teaching. Although I’ll try to answer your questions to the best of my ability, I may not have all the answers.
Hope you had a GREAT weekend!
‘Til next post, Kellie.

Thank you for sharing this tutorial.
LikeLike
Easy! Thank you for the tutorial, now I wish I could take good photos with my iPhone. I stopped carrying my digital camera a while ago.
LikeLike
I tried this!! Look at the results: http://lifeinametropolis.wordpress.com/2012/09/13/wedding-bells-ringing/ It is sooooo easy and the pictures are so much nicer afterwards! Love this way of editing pictures!!!!
LikeLike
That’s so easy! I never thought that technique. Thanks for sharing this isolating colors.
LikeLike
Gr8 tips. And I love your fashion ans style sense.
LikeLike
Can’t wait to try this out. I took a college photoshop class a few years ago and “Nothing” was as easy as you have described. Love it, thanks!
LikeLike
such an awesome, helpful post. Thanks so much for sharing 🙂 made it seem so easy!
LikeLike
This is awesome, thank you so much for posting step by step, I cannot wait to try it out!
LikeLike
Great tips, thanks so much for sharing!
LikeLike
Nice one! I’m using a different process though. I use Layer/Vector Masks though. Maybe I’ll try this one. 😉 Thanks for sharing.
LikeLike
Nice… :):):).
LikeLike
Really helpful – thank you!
LikeLike
This looks a lot easier than how I do it. Awesome!
LikeLike
Thank you! I hope you’ll be posting more interesting tips like this! I’m always making a mess of things on PS.
LikeLike
Thank you soooooo much!!! I was waiting for something like that!!! Extremely helpful, perfectly structured and easy to understand!!! You should make this a series 🙂
Thanks again!!! I’ll definitely try this technique!!
LikeLike
Thank you so much for sharing this information! This is really helpful. 🙂
LikeLike
That’s a great post! Very good idea! And how helpful!
LikeLike
Thanks so much for posting this! It’s great and I love learning new things on photoshop!
LikeLike
Gorgeous photo work and helpful information! Love it.
p.s. Thanks for stopping by my vintage blog!
LikeLike
So helpful! Thanks for this post… your photo work is beautiful.
LikeLike
You are amazing for showing us this tutorial! TY so much K!
LikeLike
Great post! What version of Photoshop do you use?
LikeLike
Hi CS4. Best, Kellie
LikeLike
THat is not how I do it, but this is interesting. I want to try it out to see how different the results will be from my usual method.
LikeLike
Hi! I also used to use a different process but found this one a lot easier. Let me know how it works for you. Best, Kellie
LikeLike
Hi Kellie! I was just working on isolating colors this past weekend! It makes a world of a difference to put more focus on certain parts of the photo. Fun stuff. Your tutorial is great! I used a different process through photoshop, but your way is a neat and easy way as you mentioned!
LikeLike
I am surprised. It really worked better than my old method! But when I tried it for blurring the old method works better. Oh well. But for black and white selective, I am so gg to be using your method. I skipped creating another layer of the image though… Just went ahead to create a black and white layer.
LikeLike